Addressing a high-water table under your house can be complex, and the best solution depends on your circumstances. There are countless ways of fixing the high-water table under the house; here are some of them.
- Installing a Sump Pump,
- Installing French Drains,
- Improving drainage and Grading,
- Waterproofing,
- Elevating Structure,
- Sealing the Cracks and Gaps,
- Considering the Crawl Space Encapsulation,
- Monitoring the water level,
- Flood insurance,
- And Finally, Consulting a Professional.
What are the Signs of a High Water Table?
Before addressing the issue, it’s essential to recognize the signs of a high water table, which may include:
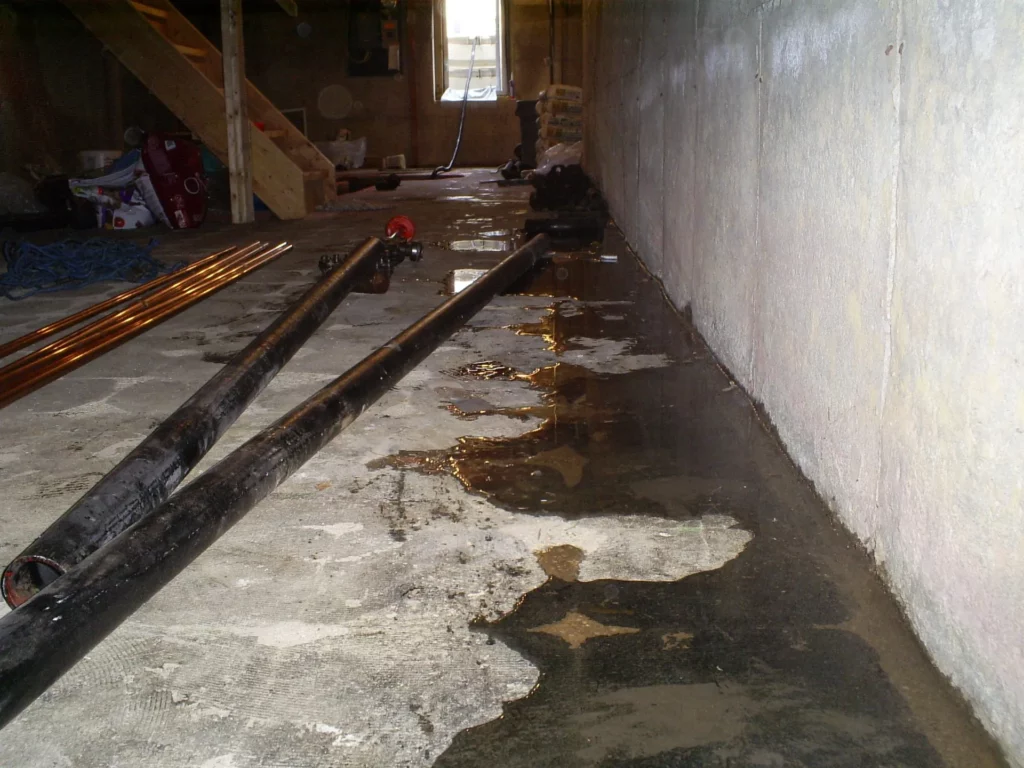
- Frequent basement flooding.
- Damp or wet crawl spaces.
- Cracks in your foundation.
- Spongy or overly moist soil around your home.
- The waterlogged yard even after light rain.
How to Fix a High Water Table Under The House?
Here are multiple methods for fixing the high water table under the house. Considering your amenities, you can choose the suitable method for fixing your high water table
Installing the Sump Pump
Installing a sump pump is an effective solution for addressing a high water table under your house. Here’s a step-by-step guide on how to install a sump pump to fix this issue:
Materials You’ll Need:
- Sump pump with a built-in float switch
- Sump pit
- Check valve
- PVC discharge pipe and fittings
- Gravel or stone
- Concrete mix (if needed)
- Screwdriver or power drill
- Pipe wrench
- Hacksaw
- Teflon tape
- Safety goggles and gloves
Steps to Install a Sump Pump for High Water Table:
Choose the Installation Location:
Identify the lowest point in your basement or crawl space where water tends to collect. This is where you’ll install the sump pit.
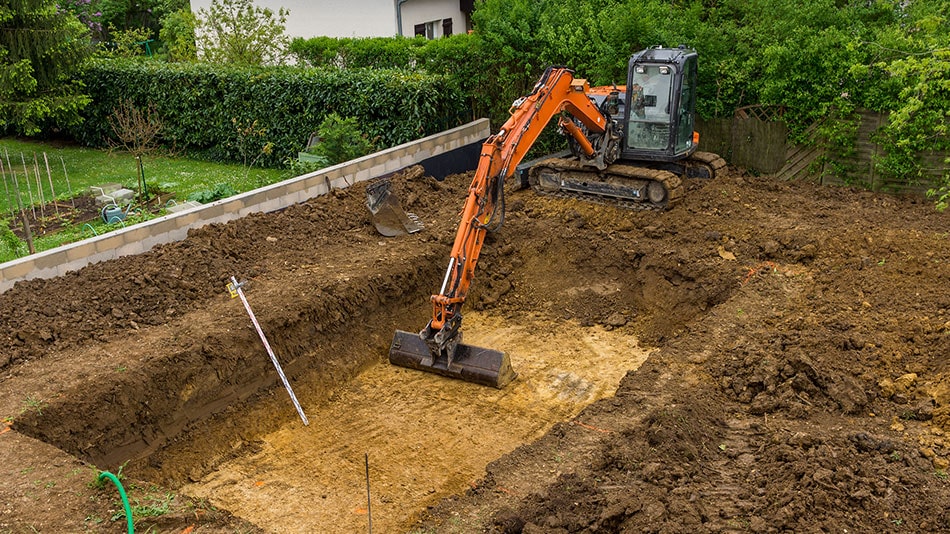
Dig the Sump Pit:
Use a shovel or mechanical digger to excavate a hole for the sump pit. Ensure the pit is deep enough for the pump and a few inches of gravel at the bottom.
Prepare the Pit:
Line the bottom of the pit with gravel or stone to provide a stable base for the sump pump.
Install the Sump Pit:
Place the sump pit in the hole, ensuring it is level and stable. Use concrete mix to create a stable base if it doesn’t sit level.
Assemble the Sump Pump:
Follow the manufacturer’s instructions on the sump pump packet to assemble the sump pump. This typically involves attaching the float switch, discharge pipe, and any other components.
Position the Pump:
Place the sump pump inside the sump pit. Ensure the pump is level and that the float switch moves freely.
Attach the Discharge Pipe:
Connect the pump’s discharge pipe and direct it to drain water away from your home safely. Ensure the pipe is sloped slightly downward away from the pump.
Secure the Discharge Pipe:
Use pipe clamps or brackets to secure the discharge pipe in place.
Install a Check Valve:
Add a check valve to the discharge pipe to prevent water from reentering the pit when the pump shuts off.
Plug in the Pump:
Plug the sump pump into a dedicated GFCI (Ground Fault Circuit Interrupter) outlet to ensure electrical safety.
Test the Sump Pump:
Pour water into the sump pit to simulate rising water levels. The sump pump should activate automatically as the water level rises. Ensure it pumps the water out through the discharge pipe as expected.
Install a Sump Pit Cover (Optional):
Consider installing a cover over the sump pit to prevent debris and odors from escaping.
Regular Maintenance:
Periodically inspect the sump pump to ensure it is in good working condition. Clean the pit and check all components, including the float switch and check valve.
Finally, A well-installed sump pump prevents basement flooding and safeguards your home’s foundation from groundwater.
Installing the French Drains
Installing French drains can effectively redirect excess groundwater away from your home, mitigating the impact of a high water table and preventing basement flooding or structural damage.
Here’s a step-by-step guide on how to install French drains to address this issue:
Materials You’ll Need:
- Shovel or trenching machine
- Perforated drainage pipe (typically 4-inch diameter)
- Landscape fabric
- Gravel or drainage rock
- PVC pipe (optional for connecting multiple drains)
- PVC connectors and couplers (if using PVC pipe)
- End cap for drainage pipe (if not connecting to an existing system)
- Backfill material (soil)
- Hand saw (if cutting PVC pipe)
- Teflon tape (if using PVC connectors)
- Safety goggles and gloves
Steps to Install French Drains for a High Water Table:
Determine Drainage Route:
Identify the areas around your home where water collects or where you want to divert water away. Plan the drainage route accordingly.
Dig a Trench:
Use a shovel or trenching machine to dig a trench along the chosen route. The trench should slope away from your house, typically at a 1% grade (1 inch of drop per 8-10 feet of run).
Calculate Pipe Depth:
Determine the depth at which you’ll install the drainage pipe. It should generally be below the frost line and deep enough to intercept the high-water table. Consult local building codes for specific depth requirements.
Line Trench with Landscape Fabric:
Lay landscape fabric along the bottom and sides of the trench. This fabric prevents soil and debris from clogging the drainage system.
Add Gravel Base:
Place a gravel or drainage rock layer in the bottom of the trench, creating a bed for the drainage pipe. The gravel should be about 2-4 inches deep.
Lay Perforated Drainage Pipe:
Position the perforated drainage pipe on top of the gravel bed with the perforations facing downward. Ensure it follows the slope of the trench.
Surround with Gravel:
Cover the drainage pipe with more gravel, filling the trench up to about 2-3 inches from the surface.
Cover with Landscape Fabric:
Fold the excess landscape fabric over the gravel and pipe to prevent soil infiltration over time.
Backfill with Soil:
Fill the remaining trench with soil, sloping it away from your house. Tamp down the soil as you go to compact it.
Connect Multiple Drains (if needed):
If you have multiple French drains, connect them using PVC pipe, connectors, and couplers. Ensure proper slope and alignment.
Install End Cap (if necessary):
If your drainage system doesn’t connect to an existing system, cap the end of the drainage pipe to prevent debris from entering.
Test the Drainage:
Pour water into the trench to test the drainage system. Ensure the water flows freely through the perforated pipe and away from your house.
Regular Maintenance:
Periodically inspect the French drains for any blockages or damage. Clean or repair as necessary.
Improving the Grading and Drainage
Enhance Grading and drainage to redirect water from your foundation, cost-effectively reducing the risk of basement flooding and foundation damage.
Proper Grading and drainage can significantly contribute to the overall resilience of your home against groundwater issues.
Here’s a step-by-step guide on how to do it effectively:
Materials You’ll Need:
- Shovel
- Wheelbarrow
- Grading rake
- Downspout extensions
- Drainage pipes (if needed)
- Gravel or stone
- Landscape fabric (optional)
- Topsoil
- Grass seed or sod (optional)
- Safety goggles and gloves
Steps to Improve Grading and Drainage for a High Water Table:
Assess the Area:
Identify the areas where water accumulates around your home. These are the spots that require grading and drainage improvements.
Create a Plan:
Develop a plan for improving the Grading and drainage. Consider the slope needed to direct water away from your house.
Gather Necessary Materials:
Collect the materials required for your project, including any additional drainage components.
Start Grading:
Use a shovel and wheelbarrow to adjust the grade around your home. Slope the ground away from the foundation to ensure water drains away from the house. The ideal slope is typically at least 1% or 2% (1-2 inches of drop per 8-10 feet of run).
Direct Downspouts Away:
Ensure that downspouts from your roof gutters extend at least 3-4 feet away from your house. Use downspout extensions if necessary to divert water further.
Install Drainage Pipes (if needed):
If you have persistent drainage issues, consider installing drainage pipes. Dig a trench along the problem area and lay the pipes with a slight slope. Cover with gravel and landscape fabric, then backfill with soil.
Create Swales or Channels:
Swales are shallow channels designed to carry water away from your home. Dig swales in areas with poor drainage and direct them toward a suitable drainage point.
Install Dry Wells (if necessary):
In areas where natural drainage is challenging, consider installing a dry well. These underground reservoirs collect and slowly release excess water.
Cover with Topsoil:
After making grading and drainage adjustments, cover the area with topsoil. Smooth the soil to ensure a uniform surface.
Plant Grass or Sod (optional):
If the graded area is suitable for landscaping, consider planting grass seed or laying sod to prevent soil erosion.
Inspect and Monitor:
Periodically inspect the graded and drained areas to ensure they are functioning correctly. Adjust as needed to maintain proper drainage.
Regular Maintenance:
Keep gutters and downspouts clean to prevent clogs that can lead to overflow and water pooling near your home.
Applying the Waterproof Coating
Properly applying a waterproof coating to your basement walls can significantly reduce the risk of water intrusion and damage caused by a high water table. Regularly inspect and maintain the coating to ensure its effectiveness over time.
Here’s a step-by-step guide on how to apply waterproof coating:
Materials You’ll Need:
- Waterproof coating (such as waterproof paint, masonry sealer, or cementitious waterproofing)
- Masonry brush or roller
- Wire brush or scraper
- Concrete patching compound (if needed)
- Caulk and caulk gun
- Protective goggles, gloves, and mask
- Drop cloths or plastic sheeting
- Safety ladder or scaffolding (if working on high walls)
- Clean rags or towels
- Mildewcide additive (optional)
Steps to Apply Waterproof Coating:
Prepare the Surface:
Clean the walls with a wire brush or scraper to remove any loose materials. Ensure the basement walls are clean and free from dirt, dust, and loose paint or coatings.
Fill Cracks and Holes (if needed):
If the walls have cracks, gaps, or holes, fill them with a concrete patching compound. Follow the manufacturer’s instructions for proper application.
Protect Surrounding Areas:
Use drop cloths or plastic sheeting to protect the floor and nearby items from splatters and drips.
Mix the Waterproof Coating (if required):
If you’re using a cementitious waterproofing product, mix it according to the manufacturer’s instructions. Some products come pre-mixed and ready to use.
Apply the First Coat:
Start at the top of the wall and work your way down. Using a masonry brush or roller, apply an even coat of the waterproof coating to the wall. Ensure full coverage, and be thorough in areas that are prone to water seepage.
Apply Additional Coats (if necessary):
Allow the first coat to dry as per instructions (usually 24-48 hours), and consider applying a recommended second coat for added protection. Apply a second coat if recommended for added protection. Some products may require up to three coats.
Caulk Joints and Seams:
Use caulk to seal joints, seams, and any gaps where walls meet the floor or other surfaces. This creates an additional barrier against water intrusion.
Add Mildewcide (optional):
Add a mildewcide additive to the waterproof coating to prevent mold and mildew growth. Mix it according to the manufacturer’s instructions.
Allow for Proper Drying:
Give the final coat of waterproof coating ample time to dry and cure. Depending on the product and environmental conditions, this can take several days to a week.
Inspect and Touch Up:
Once the waterproof coating is fully dry, inspect the walls for missed spots or areas needing touch-ups. Apply additional coating as needed.
Clean Up:
Clean your brushes, rollers, and tools with water or the recommended cleaning solution for the waterproof coating.
Crawl Space Encapsulation
Crawl space encapsulation effectively prevents moisture and groundwater from entering your crawl space, mitigating the effects of a high water table.
It also improves your house’s air quality, energy efficiency, and structural integrity.
If you’re unsure about performing this task yourself, consider hiring a professional contractor experienced in crawl space encapsulation for the best results.
Here’s a step-by-step guide on how to do crawl space encapsulation:
Materials You’ll Need:
- Vapor barrier (6-20 mil thickness)
- Sealing tape or adhesive
- Insulation (optional)
- Foam board insulation (for walls)
- Crawl space dehumidifier (optional)
- Caulk or sealant
- Crawl space vent covers (if applicable)
- Safety goggles, gloves, and a mask
Steps to Perform Crawl Space Encapsulation:
Assess the Crawl Space:
Inspect your crawl space to identify any water intrusion, moisture issues, or existing damage. Ensure that it’s dry and free of debris.
Remove Debris:
Clean out any debris, mold, or mildew present in the crawl space. Ensure it’s dry before proceeding.
Seal Off Exterior Vents:
If your crawl space has vents, seal them off permanently. This prevents outside air and moisture from entering the space.
Address Drainage Issues:
Ensure the grading and drainage system of the crawl space to redirect water away from the foundation.
Install a Vapor Barrier:
Lay a high-quality vapor barrier (polyethylene sheeting) on the crawl space floor, extending it up the walls by several inches. Overlap and secure seams with sealing tape or adhesive. This creates an airtight seal.
Insulate the Walls (Optional):
Install foam board insulation on the crawl space walls to improve energy efficiency and temperature control. Secure it in place with adhesive.
Seal Wall Penetrations:
Seal any gaps, cracks, or penetrations in the crawl space walls with caulk or sealant to prevent air and moisture infiltration.
Caulk Around Pipes and Ducts:
Seal gaps around pipes, ducts, and wiring where they pass through the crawl space walls or floor.
Install a Crawl Space Dehumidifier (Optional):
Consider installing a dehumidifier specifically designed for crawl spaces to maintain low humidity levels and prevent moisture buildup.
Regular Inspection and Maintenance:
Periodically inspect the encapsulated crawl space to ensure the vapor barrier remains intact and moisture levels are controlled.
FAQs
What is a high water table under a house?
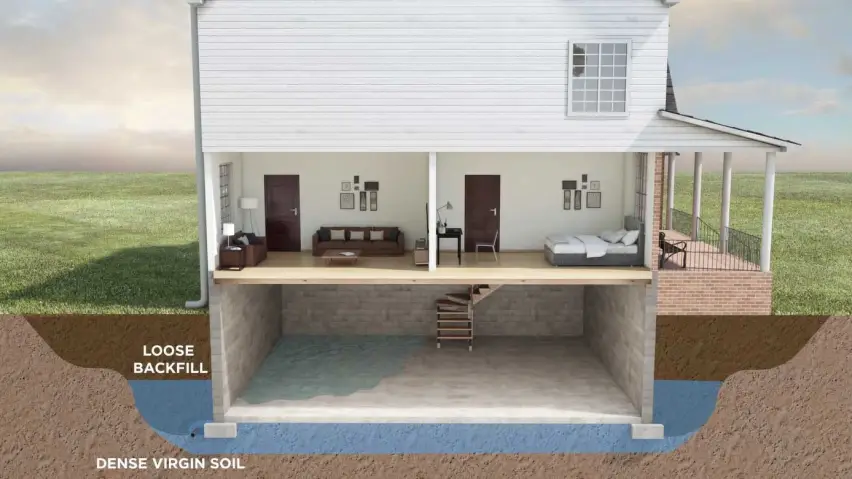
A high water table refers to the level at which groundwater sits below the surface, and if it’s too high, it can cause issues for your foundation.
Can a high water table cause foundation problems?
Yes, a high water table can cause foundation problems by exerting hydrostatic pressure on the foundation, potentially leading to cracks, shifting, or other structural issues.
How do I determine the water table level under my house?
Consult a professional geotechnical engineer who can assess the water table level through soil testing and boreholes.
Can landscaping changes help manage a high water table?
Yes, landscaping changes, such as proper Grading and drainage systems, can help manage a high water table by diverting water away from your home’s foundation.
Should I install a sump pump to address a high water table?
Yes, a sump pump can help remove excess groundwater, keeping your basement dry. So, you should install a sump pump to address a high water table.
Can French drains help with a high water table?
Yes, French drains can help manage a high water table by diverting excess groundwater away from your home’s foundation, reducing the risk of water infiltration and structural damage.
Is waterproofing the foundation a solution for a high water table?
Yes, Waterproofing the foundation can prevent moisture penetration but may not directly address the high water table. It’s often used in conjunction with other solutions.
Can I raise my home to avoid the high water table?
Yes, you can raise your home to avoid the high water table. However, the option is significantly expensive to undertake, so you must reconsider before adopting the option.
Conclusion
In conclusion, addressing a high water table under the house is crucial and should not be delayed. Ignoring this issue can lead to serious structural damage and health risks.
The key steps to fix a high water table include identifying the problem, redirecting water away from the foundation, installing proper drainage systems, and seeking professional help if necessary.
Act quickly to prevent additional damage and ensure the house’s safety and stability. Regular maintenance and monitoring of the water table and drainage systems are also recommended to prevent future problems.